Showing posts with label mommy made. Show all posts

Wednesday, January 15, 2014

Arrrggggg Matey


This year for her birthday, my girl only wanted one thing.....


.....a party fit for a pirate. 


So, a party fit for a pirate she did get. 


A few little details and a New Year's Eve spent stitching. 


I honestly think that I've officially mastered the idea of an easy handmade birthday party.......


.....and it only took me nine years and two kids. 


Happiest of happy birthdays, my little pirate. 
Here's hoping FOUR is your best year yet. 

And in case you're wondering, I am one over-the-top excited girl. 
In just a few hours, I'll be hitting the road and headed to Austin to spend the next four days with the world-changing women of Noonday Collection for our conference. 
It's basically all I've been able to think about, and I may or may not have packed last week. 

Here's hoping your weekend is anywhere close to as amazing as mine is sure to be. 

Tuesday, June 11, 2013

Crafternoon Delight.

This past weekend, the hubby away working a Christian retreat...
you know, molding young minds and whatnot. 

I realize that when some women's husband's are gone, they catch up on some girlie TV, eat bon bons, and sip margaritas. I am clearly NOT one of these women. 

You see, I am a crafter. 
But my hubby hates it. 
He doesn't hate the finished products; he hates the in-between phase..when there are paintbrushes overrunning our kitchen sink and canvases covering the table. 

So when he's gone, I craft like crazy and try to squeeze in as much as possible. 
Make sense? 
I thought so. 

So, within about an hour of Dad heading out, we got to work. 


We started with a few Father's Day gifts that I can't show you yet because the hubs reads the blog. 


Sorry, Lee, you'll have to be patient. 

And then, I tackled this project that I've been wanting to get to for forever:

We hung the springs from my baby bed on Libby's wall,
 complete with a little banner action I threw together last week. 


She can use little clothes pins and clip pictures, etc. to it. LOVE LOVE LOVE it. 

We also threw together a little collage on her wall. 


Yes, those are small clip boards. 
And that piece to the top left says LET THE WILD RUMPUS START...one of my favorite quotes ever. 

This piece was my favorite. 
It's made from the top of a shoe box, some scraps, and some pieces I printed off of the computer. 


Easy and cheap is my favorite craft combo. 


And for the finale: 


On Friday, this was a bench that sat in our carport. 
It had spent years in my grandfather's workshop. 
It was special to me but too unstable to sit on anymore. 

So, we removed the legs, worked a little magic, and made it into a very special shelf for Hollyn's room. 

And that, my friends, is what I like to call a Crafternoon Delight. 

Happy Tuesday to you and you and you. 
Libby is spending this week at camp, so we're busy watching Hollyn enjoy her time as a an only child and remembering the days of just one kiddo. Two is such a different world. And I can only imagine that three will be quite the adventure. 

Wednesday, February 1, 2012

This Used to Be a Diaper Box.....


See this pretty new storage I've added to my kitchen?

In its former life, it was a diaper box from Target.

Here's how I took it from trash to treasure:

-I cut off the four flaps on the top.

-I painted the Target diaper box so that the bright yellow wouldn't show through the burlap. I used grey, but any neutral color would have worked.

-I hot glued the burlap to the box.

-I added the bells and whistles (aka ribbon and felt flowers).

And they lived happily ever after.

The End


Today I finished Nicholas Sparks's newest book....not sure how I feel about it. Am the only one who has ever felt this way about a book? I'm thinking surely not....

And am the only one indulging in The Bachelor this season?
Poor, poor Courtney. Monday night's episode made me want to the change the channel.
You too? Good, let's be friends.

What should I read next? Ideas?

Here's hoping your Wednesdayy is wonderful and free from trashy television and books that leave you with a bad taste in your mouth.


Today I'm sharing this project here, here, here, and here.

Monday, January 9, 2012

Oink, Oink Pink Piggies Say: Hollyn's 2nd Birthday

It's no secret I love a good party.
I believe in the power of a birthday and that the lives of my little ones are worth celebrating.
 This year was no exception, but I did focus on my word for the year:
 simplify.
 I did less for this party than any other party I've thrown for my kiddos.
Also, we kept this one to just family, also something new for us.
The results: perfect.
 It was simple, and peaceful, and Hollyn loved every minute.

Here's the lowdown:

-There were super cute handmade piggy invites.


-There were little piggies and yummy yum cake balls.


-There were individual banana puddings in mason jars.


-There were precious piggies that held balloons.


-There were treats for our guests and lots of simplicity.


-There were two candles on the birthday girl's cupcake, plus one to grow on....


-There was an adorable two-year-old girl who could not have been more excited.


-There were lots of times we saw Hollyn her ever famous OOOOOOHHHHH face that we all love.


-There was singing and lots of sugar.


-And there was a slight sugar induced stare to tie it all up.


This party was nothing short of a t-total, simple success.

Now if I can only figure out how's it's possible that my baby is already two......


Today I'm linking here, here, here, here, here, here, here, here, here,  and here. That, my friends, is a whole lotta linking.

Sunday, December 18, 2011

Peppermint Body Scrub: Yummy, Yummy Stuff

SOOOOOOOO......I realize I'd said I'd be back before now.
Forgive me for keeping you waiting.
However, I can report that since we last met here, I've baked cookies with Libby, regained my throne as the Uno champion in this house, graded what feels like a thousand research papers, and finished my Christmas shopping.

{Did you hear that? That, my friends, was the sound of me breathing a sigh of relief.}

I also took some time to make some of this good stuff with Libby.

Today I give you peppermint body scrub:


As you can clearly see, this is very exciting stuff.
It's also very, very easy and makes a great little happy.

Here's what you'll need:
- one cup of sugar
-1/2 cup of olive oil
-some peppermint extract or peppermint scented oil (I got mine at Bath and Body Works forever ago...)
-five or six regular sized peppermint candy canes

First, chop the candy canes into itty bitty pieces. I highly recommend using a food processor or paying someone to do it for you. Done by hand, it takes what will feel like forever.
Second, mix the sugar, oil, and candy cane pieces. This part is easy; it mixes very quickly. Then add some extract or scented oil until your scrub smells delicious.

NOTE: I packaged mine in glass jars, and I'm regretting it-- probably not the most shower-safe idea. I suggest finding something cute and plastic instead.
I also recommend making several batches all at once. Because once you see for yourself how uh-may-zing it makes your skin feel, you're gonna want a truckload.


Here's hoping all your  Christmas ends are all tied up, and that you can sit back and enjoy the rest of this Holiday Season!


P.S. Today I'm linking here, here, and here. Show some linky love and check out these wonderful sites!

Wednesday, December 7, 2011

A Christmas Happy {An Idea for You}

I told you earlier this week that I LOVE s'mores.

Did you know I also love giving gifts?
It's true.
Giving gifts is one of my all time favorite things to do.

And here's an idea for a good one:

(Thanks again for this too cute idea, Kelle Hampton.)


It's a s'more making kit!

Included:

-bag of marshmallows
-a chocolate bar
-graham crackers
-some skewers
-jelled chafing fuel


Libby gave this one to a new friend here in town who brought over some happies while Libby was in the dumps post tonsil removal.

To show her thanks, Lib brought this to her last night:


What's YOUR favorite happy to give or receive?
I'm always on the hunt for some good ones....


Today I'm linking here. Care to join me?

Friday, December 2, 2011

And It Only Cost a Dollar

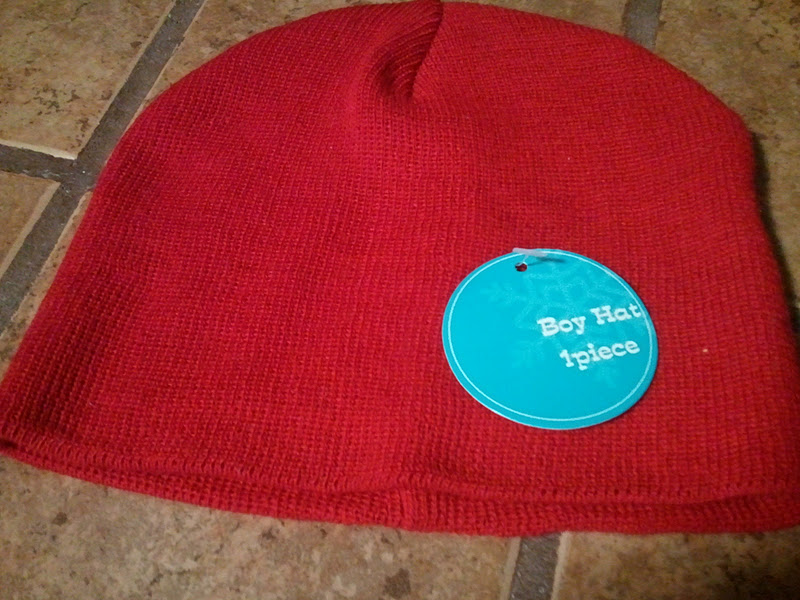
See this here hat?


I bought it...
for a dolla...
from Target' (said with a fancy French accent, as Target' should always be said).
I kinda feel like I stole it, but it was in fact a dollar.
Please ignore the fact that it was originally made with a boy in mind; I took care of that.


The first thing I did was cut some felt in the shape of a flower... five petals, two leaves, one center. You will also need four more yellow circles, cut the same size as your center circle.


Next I sewed the leaves on the front of the hat on one side.
(Please forgive me for how terribly dark these pictures are; darn you, camera phone.)


Next I stitched the petals and center. Notice, my stitching here is horrible. It could be that I'm just that bad at sewing, or it could be that I was almost out of yellow thread and didn't feel the need to run out and purchase more to complete a part of a project that NO ONE WILL EVER SEE. I'll never tell.

Moving on....


Once this was in place, I took the four yellow circles and sewed them using the same method I used in this post, and voila:


One super adorable winter hat for one super adorable, tonsil-free, little girl.
And it only cost a dollar.

How's that for a good deal?

Tomorrow for our family there will be family pictures (insert dramatic music here) and hopefully a football game. I promise to provide details and some sneak peeks as soon as possible.


Here's hoping your weekend is nothing short of magical.

Today I'm linking here, here, here, here, here, and here. That's a lot of linking, folks.

Thursday, December 1, 2011

I Heart Hydrangeas

I do heart hydrangeas, I really do.

So, when the I signed us up for family pictures on Saturday and knew I would need a grey bow for Hollyn, I also knew I was in a pinch. Where in the heck was I gonna find a grey bow in my little town? There's not even grey ribbon (or any ribbon, for that matter) at our Wal-Mart, so the possibility of making one wasn't even an option. However, while I didn't have grey ribbon, I did have grey felt. I also had the picture of a hydrangea stuck in my head.

Here's what I came up with:

I cut some grey felt into a flower shape. They didn't have to be perfect, because no one will be able to tell once all is said and done. I also cut out two green leaves (not pictured).


Then I sewed the flowers onto the rectangle, and seeing as how they won't all fit there, they overlapped, creating the hydrangea-like look. I sewed some white seed beads onto the centers as I was sewing them to the rectangle, adding to the flower-like feel. Once the sewing was all done. I hot glued my leaves to a clippie and then hot glued the rectangle on over that. The end.

Seriously, this whole project took me less than fifteen minutes, and that includes digging for white seed beads that would fit over my needle.

Anyway, here's the finished product:


 I love, love, love it.
Two points for me for using something that I had to make something that I needed.


Here's hoping your Thursday was great and that we get our tree up tonight....we shall see.
 Fingers are officially crossed.


Today I'm keeping things simple and only linking here. Sometimes the simple way is the best way.

Saturday, November 26, 2011

Oh Christmas Wreath, Oh Christmas Wreath

Thanksgiving has passed, and Christmas is in full swing at our house. We're hoping to get the tree up tomorrow and enjoy our last day of sickly holiday-ing.

To help get in the holiday spirit, I made this earlier this week:


I wanted something simple that I could possibly use at some point in the year other than Christmas but that still had that Christmas-y feel. The best part? It was free for me because I had all of these supplies on hand. The base for the wreath is made from a pool noodle which I then wrapped in burlap. The wooden A is left over from another project, and I made the little flowers.


I think they're so cute. I'll be posting on how to make them later this week via a hairbow I made for Hollyn to wear in our upcoming photo shoot. Come back then?

Here's hoping your Saturday was wonderful, and if you're in Mississippi, I hope you're listening for the sweet sound of cowbells tonight and a big GO STATE! coming from our house.


Today I'm linking here, here, and  here.

Sunday, November 13, 2011

Gobble, Gobble, Gobble

So if you've been keeping up, then you know that this weekend was spent mending my sweet, albeit rather grumpy and sickly, seven-year-old.
And while that's about as much fun as it sounds, I was perhaps two breaths away from going stir crazy, when I remembered some pool noodles I bought a few weeks ago for, get this, ten cents each. I feel like I stole them considering I knew that what I wanted to do with them would be super cute.

Bloggers, meet my new Thanksgiving wreath:


I made him in under an hour, and other than the pool noodles, I had everything I needed, so he cost me, you guessed it, a grand total of a a dime.

Here's the low down on how I made him:

First I took my pool noodles (I had two), and I cut them. I used one of them to make the big circle that became the back layer of the wreath, and the short scraps that came from shortening both noodles to make the top layer of my wreath.( I plan on using the other noodle to make a Christmas wreath in the next week or so.) I then used duct tape to form my two circles; I use that term loosely, because they don't exactly look like circles yet.


Note: If you see this and feel inspired and can't find any pool noodles this late in the season, you can certainly use a Styrofoam wreath for the back layer and even a paper plate for the front layer.

Then I covered each circle with burlap.
I tried using hot glue, but it burns the noodle, so I stuck with packing tape.


Once both circles are covered, I took some different colored felt, and cut out eight feathers using a template I made from  a piece of cardboard.


Once I cut out the feathers, I hot glued a piece of cardboard to the back of each of them to give them some support. Notice this isn't very pretty, but it doesn't matter! No one will see this part.
Once the feathers were reinforced, I taped them to the backside of the turkey, making sure they were somewhat level and even. 


I then cut out two feet, reinforced them with cardboard, and taped them to the back of the turkey.
Note: I folded the felt in half and cut both feet out at the same time, that way I know they'd look the same.


Please ignore how ugly the back of this project looks-- again, no one has to know. It can be our little secret, mkay?

I then used a cup to trace the felt that would become his eyes, drew a nose and a gobbler (don't use that word often...), and hot glued them in place.

Isn't he adorable?


Here's a shot on a lighter background so that you can see his feet:


I haven't hung him yet obviously; forgive me- it's dark.
I'll do that tomorrow and post a picture later this week.

Until then, I think I'll stare at him-- I just think he's so stinkin' cute!


Super easy, super cheap, super cute--- the way crafting is supposed to be.

What are you doing at your house to get in the Thanksgiving spirit?
We're doing any and everything we can, considering our Thanksgiving will be spent taking care of Libby; her tonsils are coming out the Tuesday before Turkey Day.

Here's hoping your weekend was fan-freakin-tastic and that we can make it another nine days without another tonsil-induced trip to the E.R.


Today I'm linking here, here, here, here, here, here, here, and here.